- Click on the New Image button
 on the Elements toolbar.
Or, select Image from the Insert menu.
The Open box is displayed.
NoteIf you try and insert an image prior to saving the file, you will see a message asking you if you want to save the file now. If you click on Yes, the Save As box is displayed.
- Locate the *.gif file
that you want to add to your page.

Note
- You can select *.jpg files. Most browser support both *.gif and *.jpg formats.
- You can also add animated GIF files. The Web Factory preview window only displays the first frame of the animated GIF. The Test View window and, Netscape and Explorer 3.0, displays the whole animated GIF.
- Click the Open button to load the image into your page.
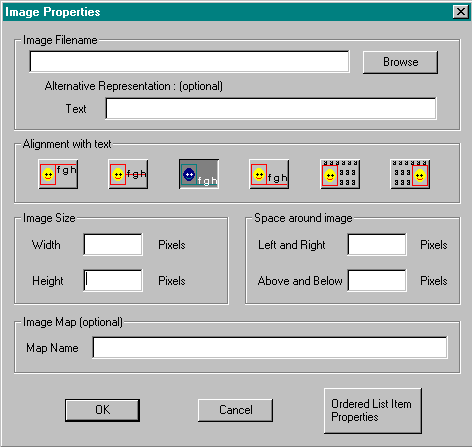
The Image Properties box is displayed.
- Alternative Representation:
Specify optional text to appear while an image is loading. The text is displayed in place of the image for those Web browsers that do not support images. - Alignment with Text:
Click the button showing how you want the text to align with the image. The third button is the default alignment. First button aligns the text alongside the top of the image.
 Second button aligns the text beside the image, half way down from the top.
 Third button aligns the baseline of the text beside the bottom of the image.
 Fourth button aligns the descenders of the text (the bottom of letters like "g" and "y") beside the bottom of the image.
 Fifth button arranges the text so that it word wraps beside the image, forcing the image to the left margin.
 Sixth button arranges the text so that it word wraps beside the image, forcing the image to the right margin.
 - Image size:
Displays the number of pixels wide and high of the image.
You can change the size of the image to be displayed in your Web page by changing the width and height. File size (number of bytes) will not change. - Space around Image:
You can insert a margin of blank space around the image (so, for example, text will not bump up right next to the image) by typing the number of pixels of blank space you want to the left and right of the image, and/or above and below the image.
- Alternative Representation:
- Click OK.
The image is inserted on the Web page.

NoteAn easy way to resize an image is to click on the image to display the handles. Use the mouse to grab a handle and drag it until you have reached the desired size. The image is then displayed with the new size, which is the size the browser will display the image. The byte size of the file does not change.
- Click on the image.
The image handles are displayed. - Click on the Right Click Pop-Up menu or use the Edit menu to access Image Properties.
Note |
See Create & Edit Images for more information on Web Factory's powerful ImagEditor. |
| RETURN TO
TABLE OF CONTENTS | GO TO
NEXT STEP |
This Web page created in Web Factory.